I sometimes wonder what it would take for a computer of 80s vintage to be a viable work terminal in today's world. After some thought, I came up with two things that an old computer would need:
- Internet access:
- Getting data to an old computer without the Internet is a thankless task, involving microcassette recordings and funky formats of floppy disc which are unreadable in a PC. Getting the data back off the computer in question is even more of a problem; it's simply orders of magnitude easier to connect to a standard network and transfer through that.
- Display compatibility:
- Computers of such vintage as the Commodore 64 and the Spectrum have a variety of display modes, but none of them put a great deal of information on the screen. To viably communicate with a computer of a different type, such as a Linux server, it's a prerequisite to extend the text mode capabilities of the computer, and get something approaching a usable terminal.
This article is intended to be part 1 of a series, in which a Commodore 64 will be set up to act as a standard Unix-compatible terminal. The first step in that ambitious program is to provide a reasonable text display on the Commodore 64.
The C64's video modes
The Commodore 64 has a display resolution of 320 by 200 pixels, a resolution which will be familiar to any PC programmer who has dealt with the VGA display modes. The C64 provides two basic types of display mode: bitmapped and tiled. Each of these has the ability to display pixels in one colour against a background of another colour. In both modes, the display is broken up logically into 8x8-pixel "tiles"; the difference is in how these are handled and how graphics are drawn in the two modes.
In tiled mode, also called "text mode", the screen has a tile-resolution of 40 wide by 25 high, and the display is built in the following manner.
The tile-address buffer, often called "Screen Memory", is a 1000-byte region of memory where each byte refers to an 8x8 block on screen. In order to get the bitmap data for the display, the video circuit uses the value in screen memory as a pointer into the tile-data buffer, called "Character Memory". When the computer is first started, this memory contains the shapes of letters and numbers which can be used to draw text on the screen; for this reason, tiled mode is often referred to as "40x25 text mode".
Tiled mode allows for each 8x8 block of pixels to have a different foreground colour; any bits in the tile which are set to "1" will be drawn in the foreground colour for that tile. Just like screen memory, a 1000-byte region is set aside for the tile-colour buffer, called "Colour Memory", which provides the foreground colours for each tile. The background is the same across the whole screen, and any "0" bits will be drawn in the global background colour.
Bitmapped mode skips the tile-addressing step in the display process, opting instead for a unified buffer of bitmap data. An 8000-byte region is set aside for the display of 320x200 bits, with blocks of 8x8 still being addressed as a tile.
Just as with tiled mode, each 8x8 block can have a different foreground colour. In the case of bitmapped mode, however, a block can also have its own background colour, which will be used instead of the global background if any "0" bits are encountered in the bitmap.
The options
So we have two options for drawing to the C64's screen. Either of these could be used for the rendering of an 80x25 text mode, but there are a few arguments against the use of tiled mode:
- It's more complex:
- Drawing to a bitmapped screen involves writing the appropriate bits to a piece of the bitmap buffer. In tiled mode, a tile has to be written into Character Memory, and Screen Memory has to be updated to reflect the new tile.
- It's slower to work with:
- Because of the above complexity of tiled mode, more memory has to be worked with to set a tile up correctly, which means it takes more time to write text out to screen.
- It's not big enough:
- By placing an 80x25 "extended text mode" into 40x25 tiled mode, each tile can hold two characters. In theory, there are over 65,000 combinations of two-character tiles, any of which could show up on screen; tiled mode can only deal with 256 of these combinations on screen at the same time, before some hacks have to be employed.
For these reasons, it's simpler to use bitmapped mode to draw the characters. What's required now is a readable font that can be used by the rendering system.
The font
Most terminal systems use a mono-spaced font, primarily because it makes calculations easier regarding text placement and size. This extended text mode will be no exception: in order to fit an 80x25 text screen into a 320x200 graphical display, each character must be 4x8 pixels: in other words, each of the 8x8 tiles must be cut down the middle and a character placed in each half.
What this doesn't take into account is the need to seperate characters: if the font is made up of 4x8-pixel glyphs, each character in a line of text will be joined to the next, without any seperation. What is instead needed is a pixel of seperation between characters: this means that the font will consist of 3x7-pixel glyphs in 4x8 boxes.
On such a small scale, designing a legible font is tricky: distinguishing between zero (0) and capital O is difficult at the best of times, and the difference between one (1), small L and the vertical pipe (|) can be even more of a problem. I'm not a font designer, so I opted instead to use the font glyphs from Novaterm, a terminal program for the C64.
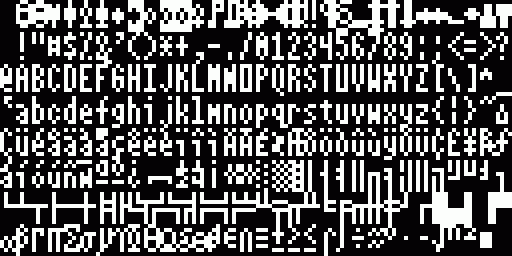
In order to use this font programmatically, each character has to be broken down into its constituent bits, and reconstituted as data. Because the glyphs are 4 pixels wide, the resultant data will be 4 bits wide.
The process
With a font and a bitmap mode, we can now draw text to the bitmap. Unfortunately, it's not quite as easy as writing one character to each tile, because there are only 40 tiles' worth of space across the screen. Instead, two characters have to be put inside one tile-space. This involves shifting the bitmap values for the "left" character across, and combining them with the "right" character.
In BASIC code, this could be represented as follows, assuming that the
FONT two-dimensional array represents the 3x7 Novaterm font:
Rendering "He" in BASIC
LET CH1 = 72:REM "H"LET CH2 = 101:REM "e"FOR A = 0 TO 7 OUT(A) = (FONT(CH1)(A) * 16) + FONT(CH2)(A) NEXT A
By using a "cursor" position to keep track of where on the screen tiles must be filled, it's relatively straightforward to use the technique above for rendering text two characters at a time. The problem arises when a string of text contains an odd number of characters: not only does the renderer have to fill half a tile instead of a full tile, but the next string will start halfway through the tile in question. Because of this, the rendering function becomes more complex:
- Check whether we're starting halfway through a tile. If so, fill in the right half of the existing on-screen tile with the first character bitmap. If not, skip this step altogether.
- The main rendering loop: For each pair of characters in the string (starting with the second character if step 1 was performed), build a tile and draw it to screen. Do this until there are either 1 or 0 characters left to render.
- If there's one character left, fill in the left half of a blank tile, and draw that to screen. If there are no characters left to draw, skip this step.
The top and bottom pieces of algorithm are extensions of the main rendering loop, and won't be covered here in much detail. Instead, I'll provide an interpretation of the insides of the main loop, in pseudo-C++.
Rendering a two-character tile
BYTE *bitmap;// 8000-byte bitmap to render toBYTE *font;// 2048 bytes font data, 8 bytes per charchar t1, t2;// Text to render (two characters long)int X, Y;// Current cursor position// Calculate position of destination tile in the bitmap // Each tile is 8 bytes longBYTE *tile = bitmap + ((Y * 80 + X) * 8); for(int i=0; i<8; i++) {// Retrieve font data for this line of the bitmapBYTE ch1 = font[t1 * 8 + i]; BYTE ch2 = font[t2 * 8 + i];// Calculate final tile contentstile[i] = (ch1 * 16) + ch2; }
In the case of the top and bottom parts of the algorithm, either ch1
or ch2 is not used in the final tile; otherwise, the code for
these parts is as above.
The implementation
There are a few things that need to be considered when taking this algorithm to the Commodore 64, in order to cope with the restrictions of the platform.
Font data:
The algorithm outlined above takes two characters from the font data, and shifts the "left" one over by 4 bits before tacking it to the "right" character. This step can be eliminated by keeping a pre-shifted copy of the font data as a seperate buffer to the original, which means that building a cell is merely a matter of finding one character in the original font, and the other in the shifted font, then adding the two values.
Initial screen colour:
As mentioned above, each tile in bitmap mode can maintain its own foreground and background colour. The values for each tile's colours are stored in Colour Memory, one byte for each tile: the background colour code (between 0 and 15) is stored as the lower half of the byte, and the foreground code as the upper half.
For the purposes of this article, we won't be dealing with different colours of text or other attributes, so all that's required is to initialise the Colour Memory: setting all the bytes to reflect "grey on black" allows for a simple monochromatic output.
Multiplication:
The 6510 CPU used by the Commodore 64 doesn't have a multiply instruction, which means we can't simply "multiply by 8" to get a font-data position. Luckily, we can use a basic property of binary powers to perform the calculation:
Multiplication by binary powers
x * 8 = x * (2 ** 3)
x * 8 = x << 3
By shifting the value left, we can simulate multiplication. In this case, however, that's not quite enough. Shifting a value left pushes the left-most bits off the end of the register, discarding the higher portion of the result: we need that higher portion, so some more calculation is required:
Multiplication by binary powers into a double-width result
x = 01101101b
LOBYTE(x * 8) = 01101101 << 3
              = [011]01101000
HIBYTE(x * 8) = [011]
              = 01101101 >> (8-3)

LOBYTE(x * 8) = x << 3
HIBYTE(x * 8) = x >> 5
The above sample demonstrates a more general rule: a 1-byte by 1-byte multiplication will generate a 2-byte result, both parts of which can be calculated by appropriate shifting. This rule can be used by the 6510 code of the implementation.
The result
After putting these algorithms into code, something like the following will be produced:
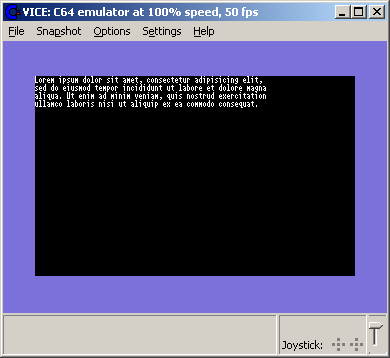
In the example above, the additional algorithms for handling newline characters have been added to the 80x25 display system, allowing the text to contain line breaks. This is simply a matter of moving the cursor down to the start of the next line when a newline character is encountered.
The system does not currently handle scrolling of the text buffer: if text is to be drawn below line 25, it will not appear on the display. Scrolling, and other control sequences including character colour, will be covered in part 2 of this series.
80x25.s: 6510 assembly source
ansi.font: Encoded font data
80x25.prg: Assembled binary, emulation-ready