Back to GameBoy Emulation in JavaScript
This is part 2 of an article series on emulation development in JavaScript; ten parts are currently available, and others are expected to follow.
The emulator described in this series is available in source form: https://github.com/Two9A/jsGB
In the previous part of this series, the computer was introduced as a processing unit, which fetches its instructions from memory. In almost every case, a computer's memory is not a simple contiguous region; the GameBoy is no exception in this regard. Since the GameBoy CPU can access 65,536 individual locations on its address bus, a "memory map" can be drawn of all the regions where the CPU has access.
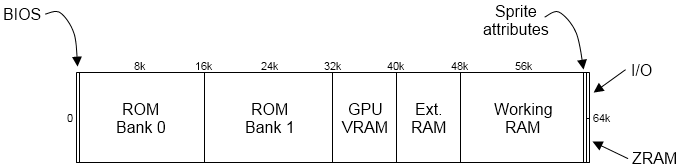
A more detailed look at the memory regions is as follows:
- [0000-3FFF] Cartridge ROM, bank 0: The first 16,384 bytes of the cartridge program are always available at this point in the memory map. Special circumstances apply:
- [0000-00FF] BIOS: When the CPU starts up, PC starts at
0000h, which is the start of the 256-byte GameBoy BIOS code. Once the BIOS has run, it is removed from the memory map, and this area of the cartridge rom becomes addressable. - [0100-014F] Cartridge header: This section of the cartridge contains data about its name and manufacturer, and must be written in a specific format.
- [0000-00FF] BIOS: When the CPU starts up, PC starts at
- [4000-7FFF] Cartridge ROM, other banks: Any subsequent 16k "banks" of the cartridge program can be made available to the CPU here, one by one; a chip on the cartridge is generally used to switch between banks, and make a particular area accessible. The smallest programs are 32k, which means that no bank-selection chip is required.
- [8000-9FFF] Graphics RAM: Data required for the backgrounds and sprites used by the graphics subsystem is held here, and can be changed by the cartridge program. This region will be examined in further detail in part 3 of this series.
- [A000-BFFF] Cartridge (External) RAM: There is a small amount of writeable memory available in the GameBoy; if a game is produced that requires more RAM than is available in the hardware, additional 8k chunks of RAM can be made addressable here.
- [C000-DFFF] Working RAM: The GameBoy's internal 8k of RAM, which can be read from or written to by the CPU.
- [E000-FDFF] Working RAM (shadow): Due to the wiring of the GameBoy hardware, an exact copy of the working RAM is available 8k higher in the memory map. This copy is available up until the last 512 bytes of the map, where other areas are brought into access.
- [FE00-FE9F] Graphics: sprite information: Data about the sprites rendered by the graphics chip are held here, including the sprites' positions and attributes.
- [FF00-FF7F] Memory-mapped I/O: Each of the GameBoy's subsystems (graphics, sound, etc.) has control values, to allow programs to create effects and use the hardware. These values are available to the CPU directly on the address bus, in this area.
- [FF80-FFFF] Zero-page RAM: A high-speed area of 128 bytes of RAM is available at the top of memory. Oddly, though this is "page" 255 of the memory, it is referred to as page zero, since most of the interaction between the program and the GameBoy hardware occurs through use of this page of memory.
Interfacing to the CPU
In order for the emulated CPU to access these regions separately, each must be handled as a special case in the memory management unit. This part of the code was alluded to in the previous part, and a basic interface described for the MMU object; the fleshing out of the interface can be as simple as a switch statement.
MMU.js: Mapped read
MMU = {
    // Flag indicating BIOS is mapped in
    // BIOS is unmapped with the first instruction above 0x00FF
    _inbios: 1,

    // Memory regions (initialised at reset time)
    _bios: [],
    _rom: [],
    _wram: [],
    _eram: [],
    _zram: [],

    // Read a byte from memory
    rb: function(addr)
    {
	switch(addr & 0xF000)
	{
	    // BIOS (256b)/ROM0
	    case 0x0000:
	        if(MMU._inbios)
		{
		    if(addr < 0x0100)
		        return MMU._bios[addr];
		    else if(Z80._r.pc == 0x0100)
		        MMU._inbios = 0;
		}

		return MMU._rom[addr];

	    // ROM0
	    case 0x1000:
	    case 0x2000:
	    case 0x3000:
	        return MMU._rom[addr];

	    // ROM1 (unbanked) (16k)
	    case 0x4000:
	    case 0x5000:
	    case 0x6000:
	    case 0x7000:
	        return MMU._rom[addr];

	    // Graphics: VRAM (8k)
	    case 0x8000:
	    case 0x9000:
	        return GPU._vram[addr & 0x1FFF];

	    // External RAM (8k)
	    case 0xA000:
	    case 0xB000:
	        return MMU._eram[addr & 0x1FFF];

	    // Working RAM (8k)
	    case 0xC000:
	    case 0xD000:
	        return MMU._wram[addr & 0x1FFF];

	    // Working RAM shadow
	    case 0xE000:
	        return MMU._wram[addr & 0x1FFF];

	    // Working RAM shadow, I/O, Zero-page RAM
	    case 0xF000:
	        switch(addr & 0x0F00)
		{
		    // Working RAM shadow
		    case 0x000: case 0x100: case 0x200: case 0x300:
		    case 0x400: case 0x500: case 0x600: case 0x700:
		    case 0x800: case 0x900: case 0xA00: case 0xB00:
		    case 0xC00: case 0xD00:
		        return MMU._wram[addr & 0x1FFF];

		    // Graphics: object attribute memory
		    // OAM is 160 bytes, remaining bytes read as 0
		    case 0xE00:
		        if(addr < 0xFEA0)
			    return GPU._oam[addr & 0xFF];
			else
			    return 0;

		    // Zero-page
		    case 0xF00:
		        if(addr >= 0xFF80)
			{
			    return MMU._zram[addr & 0x7F];
			}
			else
			{
			    // I/O control handling
			    // Currently unhandled
			    return 0;
			}
		}
	}
    },

    Read a 16-bit word
    rw: function(addr)
    {
        return MMU.rb(addr) + (MMU.rb(addr+1) << 8);
    }
};
In the above section of code, it should be noted that the region of memory between 0xFF00 and 0xFF7F is unhandled; these locations are used as memory-mapped I/O for the various chips that provide I/O, and will be defined as these systems are covered in later parts.
Writing a byte is handled in a very similar manner; each operation is reversed, and values are written to the various regions of memory instead of returned from the function. For this reason, it is not necessary to provide a full extrapolation of the wb function here.
Loading a ROM
Just as a CPU emulation is useless without its supporting elements of memory access, graphics and so on, being able to read a program from memory is useless without a program loaded. There are two main ways to pull a program into an emulator: hard-code it into the emulator's source code, or allow for loading of a ROM file from a certain location. The obvious disadvantage of hard-coding the program is that it's fixed, and cannot easily be changed.
In the case of this JavaScript emulator, the GameBoy BIOS is hard-coded into the MMU, because it isn't liable to change; the program file is, however, loaded from the server asynchronously, after the emulator has initialised. This can be done through XMLHTTP, using a binary file reader such as Andy Na's BinFileReader; the result of this is a string containing the ROM file.
MMU.js: ROM file loading
MMU.load = function(file)
{
    var b = new BinFileReader(file);
    MMU._rom = b.readString(b.getFileSize(), 0);
};
Since the ROM file is held as a string, instead of an array of numbers, the rb and wb functions must be changed to index a string:
MMU.js: ROM file indexing
	    case 0x1000:
	    case 0x2000:
	    case 0x3000:
	        return MMU._rom.charCodeAt(addr);
Next steps
With a CPU and MMU in place, it is possible to watch a program being executed, step by step: an emulation can be achieved, and produce the expected values in the right registers. What's missing is a sense of what that means for graphical output. In the next part of this series, the issue of graphics will be looked at, including how the GameBoy structures its graphic output, and how to render graphics onto the screen.
As with part 1, the source for this article is available at: http://imrannazar.com/content/files/jsgb.mmu.js.
Imran Nazar <tf@imrannazar.com>, Aug 2010.