Back to GameBoy Emulation in JavaScript
This is part 6 of an article series on emulation development in JavaScript; ten parts are currently available, and others are expected to follow.
With a working emulator and interface developed over the previous five parts, the emulation system is able to run a basic test ROM, and produce graphical output. What the emulator is currently unable to do is take keypresses as keypad input, and feed them through to the ROM under test; in order for this to be done, the keypad's influence on the I/O registers must be emulated.
With the addition of keypad I/O, the emulator runs as follows.
The keypad
The GameBoy has a single method of input, an eight-key pad out of which any number of keys can be depressed. With most keyboards, the keys are laid out in a grid of columns and rows: these can be treated as wires, between which a key can form a connection. When one of the columns is activated, any rows connected to that column will also activate, and the hardware is able to detect the active rows to determine the currently pressed keys.
With the GameBoy, the keyboard grid has two columns and four rows, which has the advantage that all the required connections can be made within one 8-bit I/O register.
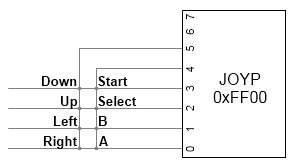
Since all six lines are tied to the same register, the GameBoy procedure for reading a key is slightly convoluted:
- Write either 0x10 or 0x20 to JOYP: this will activate either bit 4 or 5, one of the column lines;
- Wait a few cycles for the row connections to propagate to JOYP;
- Check the low four bits of JOYP, to find which rows were active for this column.
Implementation of the keypad
Writing code to simulate keypad presses is relatively simple, but two factors complicate the issue: allowing for a column to be set in the grid before rows are read, and the keypress codes that are used by JavaScript. In order to accommodate the two columns, two values must be used by the emulation, each of which holds the intersections between that column and the rows. One additional factor to take into account is that the values are reversed for the keypad: a row is left at high voltage by default, and is dropped to zero voltage when it intersects a column. This is interpreted by the I/O register as the row bits being 1 for no key pressed, and 0 for a keypress.
The JavaScript keydown and keyup events can be used to find out when a key has been pressed or released; tying these into the keypad handler can be done in the following manner.
Key.js: Object interface
KEY = {
    _rows: [0x0F, 0x0F],
    _column: 0,

    reset: function()
    {
        KEY._rows = [0x0F, 0x0F];
	KEY._column = 0;
    },

    rb: function(addr)
    {
        switch(KEY._column)
	{
	    case 0x10: return KEY._rows[0];
	    case 0x20: return KEY._rows[1];
	    default: return 0;
	}
    },

    wb: function(addr, val)
    {
        KEY._column = val & 0x30;
    },

    kdown: function(e)
    {
        // Reset the appropriate bit
    },

    kup: function(e)
    {
        // Set the appropriate bit
    }
};

window.onkeydown = KEY.kdown;
window.onkeyup = KEY.kup;
In addition to this, the MMU must be extended to handle the keypad I/O register, with an addition to the zero-page handling routines; an example of this is given below.
MMU.js: Keypad I/O interface
    rb: function(addr)
    {
	switch(addr & 0xF000)
	{
	    ...
	    case 0xF000:
	        switch(addr & 0x0F00)
		{
		    ...
		    // Zero-page
		    case 0xF00:
		        if(addr >= 0xFF80)
			{
			    return MMU._zram[addr & 0x7F];
			}
			else if(addr >= 0xFF40)
			{
			    // GPU (64 registers)
			    return GPU.rb(addr);
			}
			else switch(addr & 0x3F)
			{
			    case 0x00: return KEY.rb();
			    default: return 0;
			}
		}
	}
    }
With the keypad handler plumbed in, the remaining issue is the handling of keypresses, and the ability of the keypad code to distinguish between different keys being pressed. This can be done through the JavaScript event object; any event that runs through the browser, such as a mouse click or a keypress, will be passed to the code if it's requested, along with an object that describes the event that's just occurred. In the case of a keypress, the event object contains a character code and a "key scan" code, which both describe the key in question.
Through testing by Peter-Paul Koch, it has been determined that the character code passed by browsers to JavaScript code is unreliable, and will change depending on which browser is used. The only case on which all browsers agree is the key-scan code produced for keyup and keydown events; in any browser, pressing a given key will yield a particular value.
For the purposes of this emulator, eight keys need to be handled by the keypad code:
| Scan code | Key | Mapping |
|---|---|---|
| 13 | Enter | Start |
| 32 | Space | Select |
| 37 | Left arrow | Left |
| 38 | Up arrow | Up |
| 39 | Right arrow | Right |
| 40 | Down arrow | Down |
| 88 | X | B |
| 90 | Z | A |
As stated above, the appropriate bits must be reset when a key is pressed, and set when the key is released. This can be implemented as follows.
Key.js: Keypress handling
    kdown: function(e)
    {
    	switch(e.keyCode)
	{
            case 39: KEY._keys[1] &= 0xE; break;
            case 37: KEY._keys[1] &= 0xD; break;
            case 38: KEY._keys[1] &= 0xB; break;
            case 40: KEY._keys[1] &= 0x7; break;
            case 90: KEY._keys[0] &= 0xE; break;
            case 88: KEY._keys[0] &= 0xD; break;
            case 32: KEY._keys[0] &= 0xB; break;
            case 13: KEY._keys[0] &= 0x7; break;
	}
    },

    kup: function(e)
    {
    	switch(e.keyCode)
	{
            case 39: KEY._keys[1] |= 0x1; break;
            case 37: KEY._keys[1] |= 0x2; break;
            case 38: KEY._keys[1] |= 0x4; break;
            case 40: KEY._keys[1] |= 0x8; break;
            case 90: KEY._keys[0] |= 0x1; break;
            case 88: KEY._keys[0] |= 0x2; break;
            case 32: KEY._keys[0] |= 0x4; break;
            case 13: KEY._keys[0] |= 0x8; break;
	}
    }
Testing and next steps
Figure 1 above shows the result of these additions to the emulator, when running a basic tic-tac-toe game. In this example, the initial screen can be advanced to the credits by pressing the Start key, which is mapped to Enter by this emulator. Another press of the Start key will bring up the game screen, and the game can be played with the player as one side, and the computer as the other; pressing the GameBoy's A key (mapped to Z) will place a cross or circle on behalf of the player.
Right now, the game must be played blind, since there is no indicator of where the player places a mark. The game produces this indicator by using a sprite: a tile which can be placed by the graphics chip above the background, and moved independently. Most games produce their gameplay through use of sprites, so building them into the simulation is an important next step for this series. Next time, I'll be taking a look at the facilities provided by the GameBoy for the rendering of sprites, and how they can be implemented in JavaScript.
Imran Nazar <tf@imrannazar.com>, Sep 2010.