The source code to this project is now available in full, at: http://imrannazar.com/content/files/android-sobel.zip
In the previous part of this set of articles, I began an introduction to augmented reality, using the simple example of edge detection on Android smartphones; in that part, the camera hardware was introduced, and the framework of an application developed for the use of the camera preview. In this concluding part, the edge detection algorithm itself and its implementation will be explored.
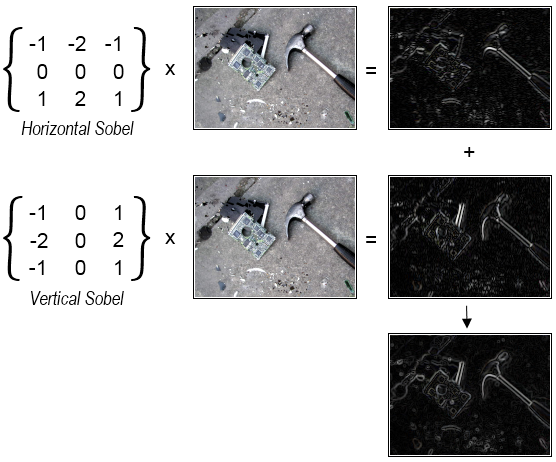
The Sobel operator
The algorithm that will be used is the Sobel operator, which works as a filter applied to each pixel in an image. The process iterates over each pixel in a row of the image, and over each row in turn, performing a factorised multiplication for each pixel value:
For Y = 1 to (Height-1)
    For X = 1 to (Width-1)
        Horiz_Sobel = (Input[Y-1][X-1] * -1) +
	              (Input[Y-1][X]   *  0) +
		      (Input[Y-1][X+1] *  1) +
		      (Input[Y]  [X-1] * -2) +
		      (Input[Y]  [X]   *  0) +
		      (Input[Y]  [X+1] *  2) +
		      (Input[Y+1][X-1] * -1) +
		      (Input[Y+1][X]   *  0) +
		      (Input[Y+1][X+1] *  1)
        Vert_Sobel =  (Input[Y-1][X-1] * -1) +
	              (Input[Y-1][X]   * -2) +
		      (Input[Y-1][X+1] * -1) +
		      (Input[Y]  [X-1] *  0) +
		      (Input[Y]  [X]   *  0) +
		      (Input[Y]  [X+1] *  0) +
		      (Input[Y+1][X-1] *  1) +
		      (Input[Y+1][X]   *  2) +
		      (Input[Y+1][X+1] *  1)
	Output[Y][X] = Pythag(Horiz_Sobel, Vert_Sobel)
    Next X
Next Y
The calculation of the Sobel operator index can be simplified in two ways:
- Removal of multiplication: Some of the indices used by the algorithm are zero, which means that the associated terms are not used in the calculation at all; conversely, some indices are negative, which means a negative value must be added. Replacing multiplications with addition and subtraction of terms means that fewer operations are required to produce the value, making the calculation quicker.
- Approximation of Pythagorean addition: For the purposes of this application, an exact value for the resultant Sobel value is not required, merely an approximation; a relatively close approximation of the Pythagorean operator is a simple average of the two values involved. This average will always be higher than the actual value, but will serve as a fair replacement.
With these modifications, the calculation can be adapted to the following.
For Y = 1 to (Height-1)
    For X = 1 to (Width-1)
        Horiz_Sobel = Input[Y+1][X+1] - Input[Y+1][X-1] + Input[Y][X+1] +
		      Input[Y][X+1] - Input[Y][X-1] - Input[Y][X-1] +
		      Input[Y-1][X+1] - Input[Y-1][X-1]
	Vert_Sobel = Input[Y+1][X+1] + Input[Y+1][X] + Input[Y+1][X]  +
		     Input[Y+1][X-1] - Input[Y-1][X+1] - Input[Y-1][X] -
		     Input[Y-1][X] - Input[Y-1][X-1]
	Output[Y][X] = Clamp((Horiz_Sobel + Vert_Sobel) / 2)
    Next X
Next Y
Before this filter can be applied to the camera preview image, the image must be taken from the camera and made ready for processing.
Handling the Camera Preview
As introduced in Part 1, the camera hardware is capable of automatically calling a predefined function whenever a frame of the preview is ready; this function is referred to as the "preview callback", and receives a byte[] containing the raw image data. By default, the preview image is in NV21 format, a standard luminance/chrominance format; for the example of a 320x240 pixel NV21 image:
- The first 76,800 bytes of the image are a direct luminance map, with each byte corresponding to a "brightness" or greyscale value for the corresponding pixel in the image;
- The following 38,400 bytes are a 2x2 subsampling of chrominance: for each 2x2-pixel block in the image, one byte encodes a U-chrominance, and the following byte a V-value.
It's relatively straightforward to perform a Sobel calculation on the luminance part of the NV21 image, and a thresholded result can be placed into the overlay canvas for each output pixel:
src/sobel/OverlayView.java: Sobel operation
    private int[] mFrameSobel;

    private void setPreviewSize(Camera.Size s)
    {
	// Allocate a 32-bit buffer as large as the preview
	mFrameSobel = new int[s.width * s.height];
        mFrameSize = s;
    }

    private void setCamera(Camera c)
    {
        mCam = c;
	mCam.setPreviewCallback(new PreviewCallback()
	{
	    // Called by camera hardware, with preview frame
	    public void onPreviewFrame(byte[] frame, Camera c)
	    {
		Canvas cOver = mOverSH.lockCanvas(null);
		try
		{
		    int x, y;
		    int w = mFrameSize.width, pos;
		    int sobelX, sobelY, sobelFinal;
		    for(y=1; y<(mFrameSize.height-1); y++)
		    {
		        pos = y * w + 1;

		        for(x=1; x<(mFrameSize.width-1); x++)
			{
			    sobelX = frame[pos+w+1] - frame[pos+w-1]
			           + frame[pos+1] + frame[pos+1]
				   - frame[pos-1] - frame[pos-1]
				   + frame[pos-w+1] - frame[pos-w-1];
			    sobelY = frame[pos+w+1] + frame[pos+w]
			           + frame[pos+w] + frame[pos+w-1]
				   - frame[pos-w+1] - frame[pos-w]
				   - frame[pos-w] - frame[pos-w-1];
			    sobelFinal = (sobelX + sobelY) / 2;

			    // Threshold at 48 (for example)
			    if(sobelFinal <  48)
			    	sobelFinal = 0;
			    if(sobelFinal >= 48)
			    	sobelFinal = 255;

			    // Build a 32-bit RGBA value, either
			    // transparent black or opaque white
			    mFrameSobel[pos] = (sobelFinal << 0) +
			                       (sobelFinal << 8) +
					       (sobelFinal << 16) +
					       (sobelFinal << 24);
			}
		    }


		    // Copy calculated frame to bitmap, then
		    // translate onto overlay canvas
		    Rect src = new Rect(0, 0, mFrameSize.width, mFrameSize.height);
		    Rect dst = new Rect(0, 0, cOver.getWidth(), cOver.getHeight());
		    Paint pt = new Paint();
		    Bitmap bmp = Bitmap.createBitmap(mFrameSobel,
		    				     mFrameSize.width,
		    				     mFrameSize.height,
						     Bitmap.Config.ARGB_8888);

		    pt.setColor(Color.WHITE);
		    pt.setAlpha(0xFF);
		    cOver.drawBitmap(bmp, src, dst, pt);
		}
		catch(Exception e)
		{
		    // Log/trap rendering errors
		}
		finally
		{
		    mOverSH.unlockCanvasAndPost(cOver);
		}
	    }
	});
    }
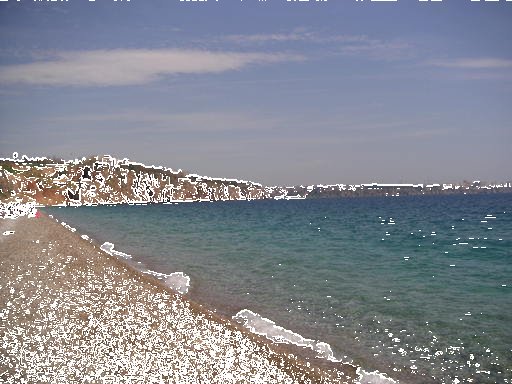
The above code, when run as part of the camera preview, yields the following view.
Optimising the operation
As written, there's a problem with this application: speed. When run on a hardware device, the overlay calculation is incapable of maintaining a near-real-time speed of augmented display; in the case of my own hardware, a rendering speed of around 3 frames per second was achieved. This is due, in the main, to the calculations being performed within a buffer of managed memory in the Dalvik virtual machine: every access to the camera preview data is checked for boundary conditions, as is every pixel value written to the overlay canvas. All of these checks for boundary conditions take time away from the Sobel operation.
To alleviate this issue, the calculation can be performed in native code bypassing the virtual machine; this is done through the Android Native Development Kit (NDK). The NDK is an implementation of the Java Native Interface (JNI), and as such behaves in a very similar way to standard JNI: native code is placed into functions conforming to a particular naming standard, and they can then be called from the Java VM as specially marked native functions.
NDK native functions are named according to the package and class they're destined for: the standard format is Java_<package>_<class>_<function>. In this particular case, the destination is package sobel and class OverlayView, so the interface can be built as below.
jni/native.c: NDK processing interface
#include <jni.h> JNIEXPORT void JNICALL Java_sobel_OverlayView_nativeSobel(/* Two parameters passed to every JNI function */JNIEnv *env, jobject this,/* Four parameters specific to this function */jbyteArray frame, jint width, jint height, jobject out) {/* Perform Sobel operation, filling "out" */}
src/sobel/OverlayView.java: Native function definition
class OverlayView
{
    private native void nativeSobel(byte[] frame,
    				    int width,
				    int height,
				    IntBuffer out);
}
Note that in the above code, the int[] array used beforehand for overlay output has been replaced by an IntBuffer; this is to allow access to the raw memory buffer for native work, since a standard int[] has memory allocated by the JVM, and cannot be written to by the JNI. Buffers are designed to allow direct access to the buffer memory through the object's GetDirectBufferAddress function, which we can use for writing the output of the Sobel operation.
The Java code shown above for the operation can be translated directly to C code, as below:
jni/native.c: Sobel implementation
#include <jni.h>

JNIEXPORT void JNICALL Java_sobel_OverlayView_nativeSobel(
	JNIEnv *env, jobject this,
	jbyteArray frame, jint width, jint height, jobject out)
{
	/* Get a pointer to the raw output buffer */
	jint *dest_buf = (jint*) ((*env)->GetDirectBufferAddress(env, out));

	/* Get a pointer to (probably a copy of) the input */
	jboolean frame_copy;
	jint *src_buf = (*env)->GetByteArrayElements(env, frame, &frame_copy);

	int x, y, w = width, pos = width+1;
	int maxX = width-1, maxY = height-1;
	int sobelX, sobelY, sobelFinal;

	for(y=1; y<maxY; y++, pos+=2)
	{
		for(x=1; x<maxX; x++, pos++)
		{
			sobelX = src_buf[pos+w+1] - src_buf[pos+w-1]
			       + src_buf[pos+1] + src_buf[pos+1]
			       - src_buf[pos-1] - src_buf[pos-1]
			       + src_buf[pos-w+1] - src_buf[pos-w-1];
			sobelY = src_buf[pos+w+1] + src_buf[pos+w]
			       + src_buf[pos+w] + src_buf[pos+w-1]
			       - src_buf[pos-w+1] - src_buf[pos-w]
			       - src_buf[pos-w] - src_buf[pos-w-1];

			sobelFinal = (sobelX + sobelY) >> 1;
			if(sobelFinal < 48)
				sobelFinal = 0;
			if(sobelFinal >= 48)
				sobelFinal = 255;

			dest_buf[pos] = (sobelFinal << 0)  |
					(sobelFinal << 8)  |
					(sobelFinal << 16) |
					(sobelFinal << 24);
		}
	}
}
src/sobel/OverlayView.java: Calling the native function
    private IntBuffer mFrameSobel;

    private void setPreviewSize(Camera.Size s)
    {
	// Allocate a 32-bit direct buffer as large as the preview
	mFrameSobel = ByteBuffer.allocateDirect(s.width * s.height * 4)
				.asIntBuffer();
        mFrameSize = s;
    }

    private void setCamera(Camera c)
    {
        mCam = c;
	mCam.setPreviewCallback(new PreviewCallback()
	{
	    // Called by camera hardware, with preview frame
	    public void onPreviewFrame(byte[] frame, Camera c)
	    {
		Canvas cOver = mOverSH.lockCanvas(null);
		try
		{
		    nativeSobel(frame,
		    		mFrameSize.width, mFrameSize.width,
				mFrameSobel);

		    // Rewind the array after operation
		    mFrameSobel.position(0);

		    Rect src = new Rect(0, 0, mFrameSize.width, mFrameSize.height);
		    Rect dst = new Rect(0, 0, cOver.getWidth(), cOver.getHeight());
		    Paint pt = new Paint();
		    Bitmap bmp = Bitmap.createBitmap(mFrameSobel,
		    				     mFrameSize.width,
		    				     mFrameSize.height,
						     Bitmap.Config.ARGB_8888);

		    pt.setColor(Color.WHITE);
		    pt.setAlpha(0xFF);
		    cOver.drawBitmap(bmp, src, dst, pt);
		}
		catch(Exception e)
		{
		    // Log/trap rendering errors
		}
		finally
		{
		    mOverSH.unlockCanvasAndPost(cOver);
		}
	    }
	});
    }
Once the Java code has been configured to call the native function for processing, the lack of extraneous work by the JVM results in a significant speed-up: under testing on my hardware, a speed of 15-20 frames per second was easily achievable, and this can be improved through further optimisation of the algorithm.
In conclusion
The Android documentation for the NDK states:
"Using native code does not result in an automatic performance increase, but always increases application complexity."
In the case of the memory-intensive processing presented here, the NDK has a significant advantage over the Java virtual machine, in that it doesn't perform bounds checking on array and pointer accesses. Since most augmented reality applications will need to work on the camera preview image, and provide an overlay on top of the preview, the technique of shunting processing into an NDK function can be useful.
Imran Nazar <tf@imrannazar.com>, May 2011.